How to Embroider Flowers: A Step-by-Step Beginner’s Guide
Embroidered flowers are decorative stitches that form petals, stems, and buds on fabric. They make plain fabric more beautiful and are often used on baby dresses, denim jackets, napkins, and home décor. Many beginners love floral embroidery because it uses simple stitches and creates quick results.
But, many beginners don’t know the right of how to embroider flowers. So, if you want to decorate clothes, add detail to accessories, or practice hand embroidery, this guide will show you how to embroider flowers step by step with tools, beginner stitches, and easy patterns.
1. What are Embroidered Flowers?
Embroidered flowers are floral shapes stitched onto fabric using thread and a needle. They can be simple designs like daisies or detailed patterns such as roses or sunflowers.
Embroidering flowers is different from how to embroider letters. With letters, you follow straight or curved lines to form words. However, with flowers, you combine stitches to create round shapes, petals, and textures. The goal is not just to outline but to build a design that looks like a natural element.
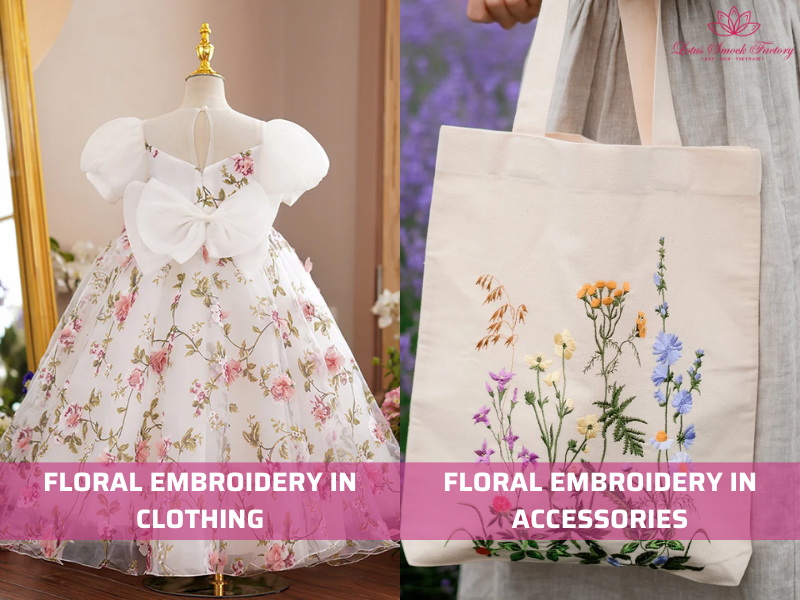
You can apply floral embroidery to many items, including:
- Clothing: baby dresses, jeans, blouses, or seasonal boutique outfits.
- Accessories: tote bags, hats, scarves, or small pouches.
- Home textiles: napkins, tablecloths, pillow covers, or wall art.
Beginners often start with small flowers such as daisies or lavender because they use simple stitches. As you gain experience, you can expand into more detailed flower embroidery patterns like roses or clusters of wildflowers.
Embroidered flowers are practical for both personal and boutique projects. They add character to everyday fabric, make baby clothes more personal. Moreover, it also gives fashion items such as denim jackets a hand-finished look.
2. Tools & Materials You Need for Flower Embroidery
Before you start stitching, prepare the right embroidery supplies for flowers. The right fabric, thread, and tools make your work easier and your stitches cleaner.
| Item | Options / Examples | Why You Need It |
| Fabric | Cotton, linen, denim | Cotton and linen are stable and easy for beginners. Denim works well for bold floral designs on jackets or jeans. |
| Needles | Embroidery needles #5–10 | Medium-size needles pierce fabric smoothly without leaving large holes. Smaller numbers are thicker, larger numbers are finer. |
| Threads | Stranded cotton floss, silk threads | Cotton floss is easy to split into strands for petals. Silk gives a smooth shine for delicate flowers. |
| Hoop | Wooden or plastic embroidery hoop | Holds fabric tight and prevents puckering while you stitch petals and leaves. |
| Extras | Transfer pen, stabilizer, sharp scissors | Transfer pens help draw flower patterns. Stabilizer supports thin fabric. Scissors keep thread ends neat. |
If you prepare carefully, it will help you focus on your stitches instead of fixing problems later. We recommend choosing fabric and thread that match your design, and always keep your hoop tight for the best results.
3. Basic Stitches for Flower Embroidery (Beginner-Friendly)
Floral embroidery looks complex, but most flowers can be created with just a few simple stitches. Below are the stitches you should practice first. These will help you build petals, centers, and outlines for your designs.
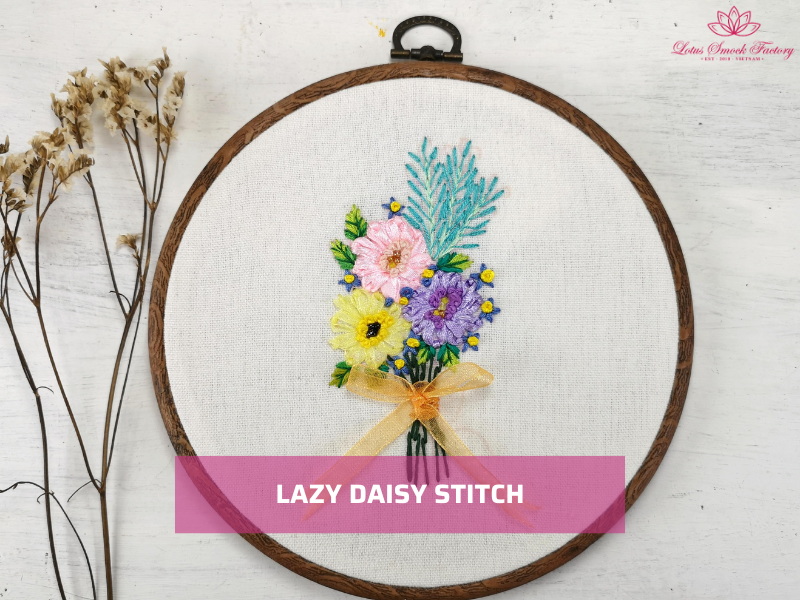
3.1. Lazy Daisy Stitch (Petals)
The lazy daisy stitch flower is the classic way to create simple petals. You follow these steps below to try it:
- Bring the needle up through the fabric at the base of the petal.
- Insert it back down at the same point to form a loop.
- Hold the loop with your finger and bring the needle up just outside the base.
- Catch the loop with a small stitch to secure it.
This stitch is perfect for daisies, lavender sprigs, and clusters of small flowers.
3.2. Satin Stitch (Filling Petals & Leaves)
The satin stitch gives petals and leaves a smooth, filled look. It is often used for roses, tulips, or bold designs. To practice the satin stitch, follow these steps:
- Outline the shape of the petal or leaf.
- Make straight stitches side by side until the shape is filled.
- Keep your tension even so the stitches lie flat and smooth.
Expert Tip: Change the number of floss strands to adjust thickness. More strands create bold petals; fewer strands add delicate shading.
3.3. French Knot (Flower Centers)
The French knot adds dots and texture, making it ideal for pollen or small buds. You can also group knots together for tiny blossoms. Try the steps below:
- Bring the needle up through the fabric.
- Wrap the thread around the needle one to three times.
- Insert the needle back into the fabric close to the starting point.
- Pull through slowly while holding the thread taut.
- This stitch is quick to learn and adds realistic detail to your flowers.
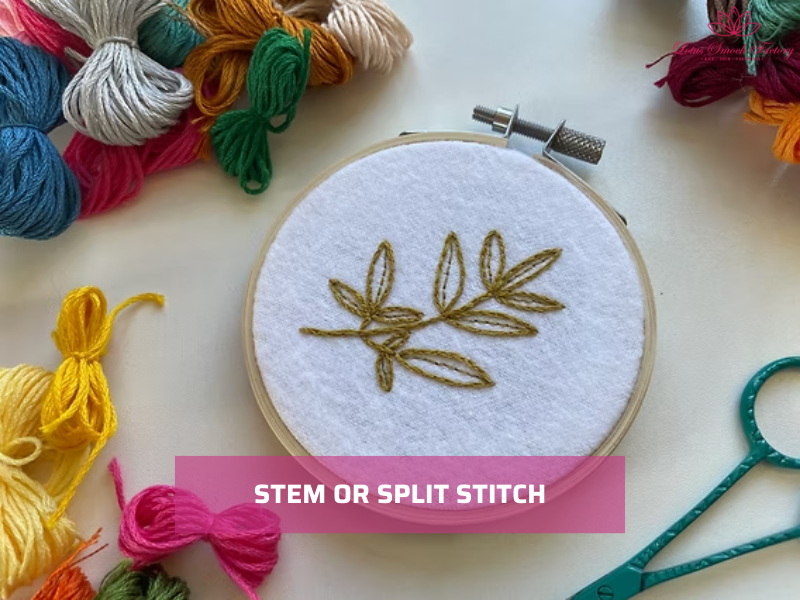
3.4. Stem or Split Stitch (Stems & Outlines)
Stem and split stitches are used to make lines, stems, and outlines. Both give a textured look and help connect petals to the rest of the flower. Use the steps below to practice:
- For stem stitch: Make a short stitch forward, then bring the needle up halfway back on the line. Then, you repeat this process to create a twisted rope effect.
- For split stitch: Bring the needle through the middle of the previous stitch, splitting the thread as you continue.
These stitches are flexible and work well for stems, leaf veins, and even lettering in floral embroidery.
3.5. Woven Wheel / Bullion Knot Rose
The woven wheel and bullion knot create a 3D rose effect. They take more time, but the result is eye-catching. Follow these steps to try them:
- For a woven wheel: Stitch a star shape with five straight spokes. Then you weave the thread over and under each spoke until the circle is filled.
- For a bullion knot: Wrap the thread around the needle several times. After that, you pull it through to form a coil, then shape the coils into petals.
These stitches are featured in many embroidered roses tutorials because they give a realistic and textured finish to floral designs.
4. Step-by-Step: How to Embroider Flowers
Floral embroidery may look detailed, but when broken down into steps, it becomes easy to follow. This guide will take you from preparing your fabric to finishing a clean design. You should work through each stage slowly, and your flowers will look neat and balanced.
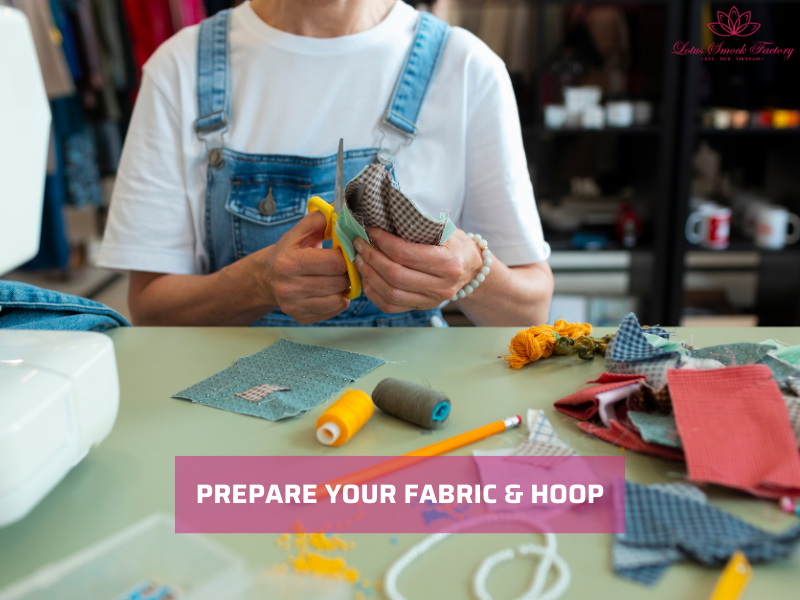
4.1. Step 1: Prepare Your Fabric & Hoop
Good preparation keeps your embroidery stable and smooth. Before you begin stitching, set up your fabric properly. Follow these steps:
- Wash the fabric to remove dirt or factory finishes.
- Iron it flat so you work on a smooth surface.
- Place the fabric inside an embroidery hoop and tighten the screw until it feels firm.
Note: Tight fabric helps your petals form evenly and prevents puckering as you stitch.
4.2. Step 2: Transfer Your Flower Design
Your design acts as the guide for your stitches. There are different ways to transfer flower patterns onto fabric. You can try the following:
- Use a water-soluble transfer pen to draw the design directly.
- Trace patterns with light-colored tracing paper.
- Place carbon paper under the pattern to press outlines onto the fabric.
- For simple flowers like daisies, draw freehand circles and petal marks with a pencil or washable marker.
Note: If you choose the right method, you will have the clearest lines without staining the fabric.
4.3. Step 3: Start with Petals
Petals form the main shape of your flower, so begin here. You can use two beginner-friendly stitches to create them. Try these:
- Lazy daisy stitch: Ideal for small petals and delicate shapes. You make loops for each petal around a center point.
- Satin stitch: Works for bold petals like roses or tulips. You fill the petal shape with straight stitches laid side by side.
Note: You should keep your stitches even and follow your outline. Work one petal at a time to stay neat.
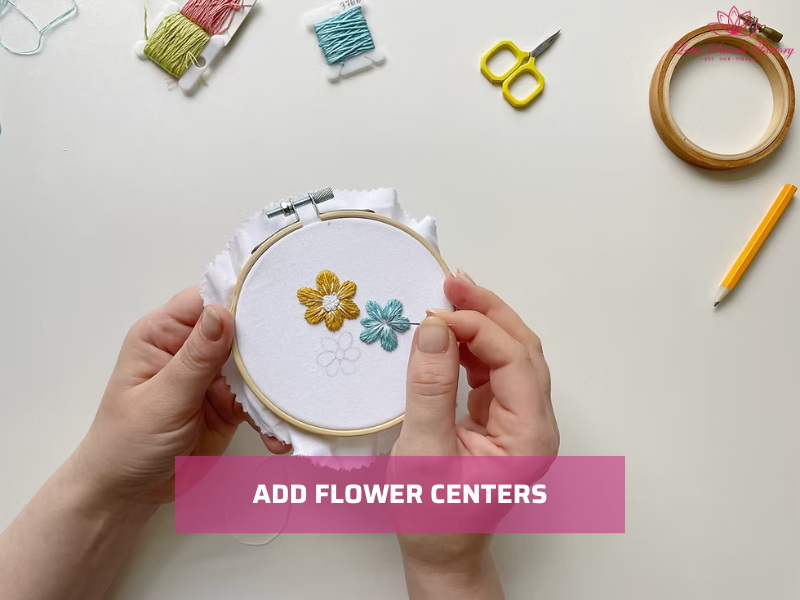
4.4. Step 4: Add Flower Centers
Once petals are complete, move to the center of the flower. Centers add detail and make the flower look realistic. Here are two easy methods:
- Use French knots for dotted centers, pollen, or small buds.
- Try small satin stitches for a smooth, filled look.
Note: French knots give texture, while satin stitches keep the center flat and solid. Both are effective depending on your design.
4.5. Step 5: Stitch the Stems & Leaves
Stems and leaves connect your flowers and complete the design. Line stitches are best for this part. Use one of these options:
- Stem stitch: Create a twisted rope effect that looks natural for stems.
- Split stitch: Bring the needle through the middle of each stitch for a textured line.
Both stitches also work well for leaf veins or outlining larger shapes. They are simple, controlled, and give smooth results.
4.6. Step 6: Finish & Secure Your Design
Finishing correctly keeps your embroidery clean and durable. Always secure the back before trimming. Follow these steps:
- Tie off the thread neatly at the back of the fabric.
- Trim any extra threads close to the knot.
- Check the front for loose strands and tidy them.
This final step keeps the front tidy and makes the embroidery last longer, especially on clothes and accessories.
Tips: If you are a boutique owner, embroidering flowers can help you maximize your store’s profits. Because parents often love highly personalized seasonal products like Christmas Smocked Outfit, I Love Mom Smocked Outfit, or other occasions.
5. Common Mistakes & How to Fix Them
Even simple floral stitches can go wrong if you do not prepare or control your thread correctly. Here are the most common mistakes in flower embroidery and how to solve them.
Puckering fabric
The fabric gathers or wrinkles around the stitches. This happens when the hoop is pulled too tight or when the fabric lacks support.
To fix this, you add a stabilizer behind the fabric and tighten the hoop just enough to keep it firm without stretching it.
Uneven petals
Some petals look larger or crooked compared to others. This makes the flower appear unbalanced.
To prevent this, you mark small placement dots around the center before stitching each petal. Then you use the dots as a guide to keep all petals even.
Loose knots
French knots or other small details may slip or fall apart after washing. This usually comes from using long thread lengths or weak tension.
The solution is to cut shorter lengths of thread, about 35–40 cm, and keep steady tension as you pull the knot tight.
Color imbalance
Flowers sometimes look flat if only one color is used. A single shade makes petals appear dull and less realistic.
To improve this, you combine two or three shades of the same color. Then you use darker tones near the center and lighter tones at the edges for a natural effect.
6. Flower Patterns to Try as a Beginner
When you are learning floral stitches, it helps to start with simple shapes. These patterns are beginner-friendly and use the basic stitches you already practiced. With a little time, you can create easy flower embroidery for beginners that looks beautiful on fabric.
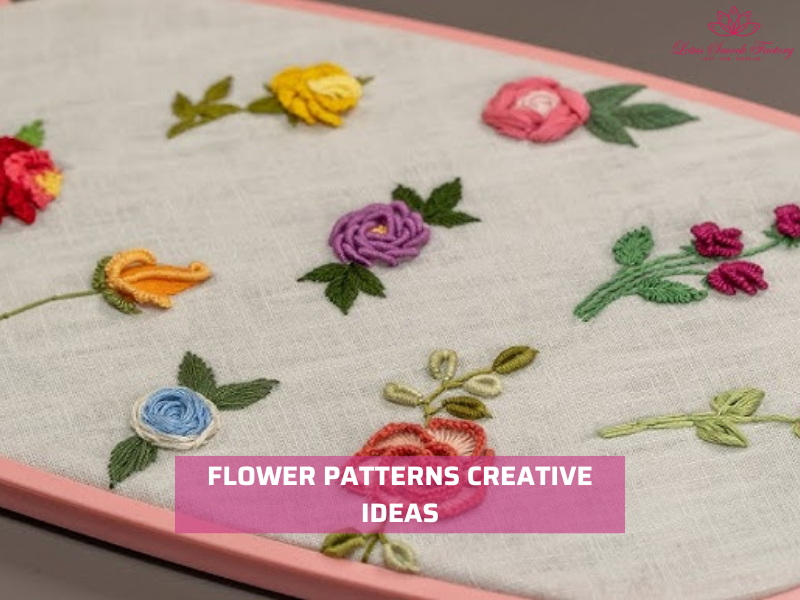
Daisy
The daisy is one of the simplest flowers to stitch. You use the lazy daisy stitch for each petal and add a French knot in the center. This design works well for napkins, handkerchiefs, or baby clothes.
Rose
Roses give a fuller look and are fun once you know the method. You start with a woven wheel or try a bullion knot for petals. Then, you fill any gaps with satin stitch for smooth edges. This is a common technique in many DIY embroidered flower projects.
Sunflower
Sunflowers are bold and bright. You create the petals with satin stitch so they look strong and defined. Then, you add a cluster of French knots in the middle for the pollen effect. This style looks good on tote bags or denim jackets.
Tiny flower clusters
Clusters make good fillers around larger flowers. You stitch small petals with lazy daisy stitch and connect them with stem stitch lines. This design is quick and ideal for borders, collars, or sleeves.
These beginner patterns let you practice different stitches while building full designs. Start with one daisy or rose, then mix patterns together to create unique floral arrangements on clothes, accessories, or home décor.
7. Practical Uses of Flower Embroidery on Clothes & Projects
Adding embroidered flowers on clothes is a simple way to make everyday fabric more personal and stylish. Floral designs look good on both casual and boutique items, and they work well on many types of fabric. Here are a few ideas for where to apply your stitches.
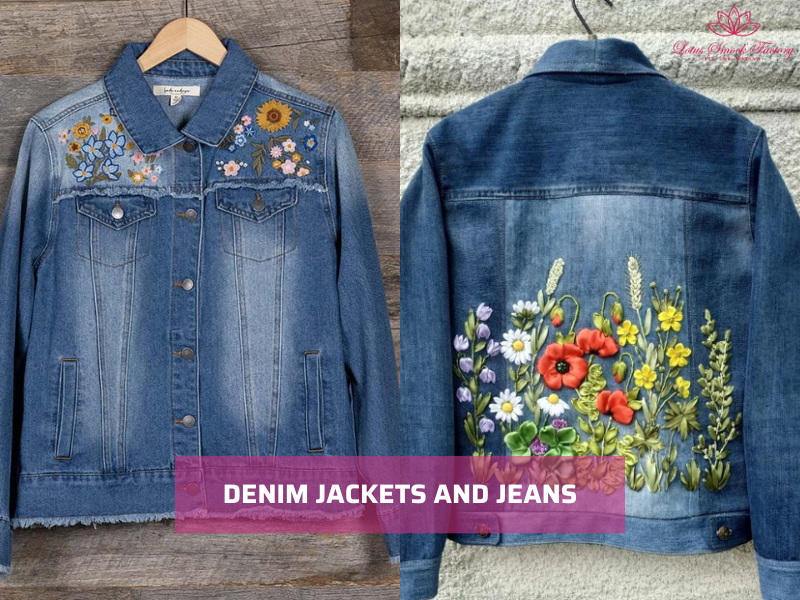
Denim jackets and jeans
Denim is strong and holds stitches firmly. Try floral embroidery on denim jackets by placing roses or sunflowers across the back panel or on the sleeves. Small daisies on jean pockets also make a nice detail.
See our full guide on how to embroider on denim HERE if you want step-by-step tips.
Baby dresses and outfits
Soft fabrics like cotton and linen are easy to decorate with small flower motifs. A cluster of lazy daisy stitches on the collar or sleeves adds charm. Therefore, boutiques often combine flowers with names or initials for personalized babywear.
Blouses and shirts
Place small embroidered flowers along button plackets, collars, or cuffs. This subtle decoration makes plain blouses look refined without being too bold.
Tote bags and accessories
Tote bags, scarves, and hats are perfect for larger flower patterns. Sunflowers or roses stitched on the front of a bag make strong statement pieces.
8. FAQs
8.1. What is the easiest flower to embroider?
The daisy is the easiest flower to start with. You can use the lazy daisy stitch for petals and a French knot in the center. It is simple, quick, and gives neat results even for beginners.
8.2. How long does it take to embroider a flower?
The time depends on the size and stitch style. A small daisy can take 10–15 minutes, while a larger rose with woven or bullion stitches may take 30–45 minutes. Practice helps you finish faster.
8.3. Can you embroider flowers on stretchy fabric?
Yes, but it requires extra support. Always use a stabilizer behind stretchy fabric to stop it from pulling or puckering. Keep the hoop tight, but not overstretched.
8.4. Which stitches make flowers look realistic?
Layered satin stitch adds depth to petals, French knots give texture for centers, and woven wheel roses create a 3D effect. Combining two or three stitches makes flowers look more natural.
8.5. Can beginners learn without a hoop?
Yes, but it is harder to keep the fabric smooth. A hoop keeps tension even and helps your stitches stay clean. Beginners should practice with a hoop first before trying embroidery without one.
9. Final Words
Now you know the basics of how to embroider flowers by hand. With simple stitches such as lazy daisy, satin, and French knots, you can make petals, stems, and centers that stand out on any fabric. Try your first flower today and continue with more guides, like how to embroider letters or how to embroider on denim, to expand your skills.
Lotus Smock is a brand of TAQ SERVICE TRADING DEVELOPMENT JSC. In clothing business, we’ve been crafting unique pieces for the domestic market since 2010. We prioritize the quality, so we don’t accept overly big orders. We are committed to producing high-quality products at the best prices. Recently, we have started engaging in social media and marketing to reach international customers, bringing the best products from Vietnam to friends around the world.
Contact Lotus Smock at:
- Facebook: facebook.com/lotussmockfactory
- WhatsApp: +84 83 333 3498
- Youtube: youtube.com/@LotusSmockFactory