How Do You Smock Fabric? A Step-by-Step Guide for Beginners
How do you smock fabric? Smocking is a sewing method that allows fabric to stretch and appear beautiful without the use of elastic. People often add smocking to baby clothes, boutique dresses, sleeves, and waistbands. The stitches hold fabric in small folds to give both comfort and style. Many beginners feel it looks hard, but with the right tools and steps, smocking is easy to learn.
In this guide, you will learn what smocking is, how to prepare the fabric, and how to stitch by hand. Keep reading to start your first smocking project today.

1. What Is Smocking?
Smocking is a sewing method where you gather fabric into small, even folds and hold them in place with decorative stitches. When people ask what is smocking in sewing, the simple answer is that it makes fabric both flexible and attractive without using elastic.
Smocking fabric by hand was first used to give stretch to work clothes. Over time, it became a decorative feature on dresses and baby clothes.
1.1. Main uses in garments
You often see smocking in these areas:
- Bodices: Add comfort and fit without zippers or buttons.
- Cuffs: Give sleeves a neat, flexible finish.
- Waistbands: Keep skirts or pants snug but not tight.
- Sleeves and yokes: Add style and a touch of handcrafted detail.
1.2. Smocking Vs. Shirring
Smocking and shirring look similar, but they are not the same. For beginners, you should know the difference between them before stitching. The differences include:
- Smocking is stitched by hand (or with special stitches on a machine). The focus is on patterns and design. Smocking holds shape even when stretched, while shirring relies on the elastic.
- Shirring is stitched with elastic thread on a sewing machine. The goal is stretch, not decoration.
1.3. Why do people still value smocking
Boutiques and home sewists use smocking because it:
- Gives fabric a premium look without heavy materials.
- Lasts a long time because the stitches strengthen the fabric.
- Makes clothing feel handmade and detailed, which raises value.
- Works well for baby and children’s wear where comfort and softness matter.
Smocking makes fabric both flexible and attractive without using elastic
2. Tools and Materials You Need
To start smocking, you only need a few basic items. Using the right smocking tools will make your work faster and neater. Here is a quick guide to what you need:
| Category | Options & Notes |
| Fabric |
|
| Threads |
|
| Needles |
|
| Marking Tools |
|
| Pleater Machine (Optional) | Roll the fabric through the needles to make even pleats quickly. Useful for accuracy, but hand pleating also works. |
| Extras |
|
Expert Tips
- For beginners: Keep it simple. Use cotton, embroidery floss, and a crewel needle. Pleat by hand so you understand the process.
- For intermediate sewists: Try batiste fabric with a pleater machine to speed up work. Use contrasting floss colors for decorative honeycomb or cable stitches.
- For advanced makers: Combine voile fabric with lace trims and a monogram frame for boutique-level garments. Use a mix of floss and metallic thread for detail work. A pleater machine plus careful grid marking will give perfect panels that sell well in high-end markets.
3. Preparing Fabric for Smocking
Good results depend on how you prepare the fabric. So before you stitch smocked outfits, you should prepare the fabric carefully.
Here are the key steps:
- Measure and cut extra width: Add about two to three times the finished width of the area you want to smock. For example, if you want a 10 cm smocked panel, cut 20–30 cm of fabric. This extra width gives room for pleating fabric for smocking.
- Mark a grid or dots: Use a water-soluble pen or chalk to draw straight lines or place dots across the fabric. The grid guides your pleats and keeps stitches even. Beginners can use ready-made iron-on dot sheets.
- Pleat manually or with a pleater:
- By hand: Fold and stitch with gathering thread to pull the fabric together.
- With a pleater machine: Roll the fabric through to create small, even pleats faster.
- Secure pleats with gathering stitches: Run strong sewing thread through each row to hold the folds in place. Knot the ends so the gathers don’t loosen. This step is key to gathering fabric for smocking.
- Light press to set folds: Use a warm iron and gentle steam. Do not flatten the pleats completely. Just press enough to set the shape so stitching will be easier.
Expert Tips
- Beginners should start with cotton fabric because it holds pleats well and is easy to mark.
- Intermediate sewists can use a grid template for precision, combined with a pleater machine for speed.
- Advanced makers can blend fine fabrics like voile or batiste with a pleater, then add decorative trims later for boutique quality.
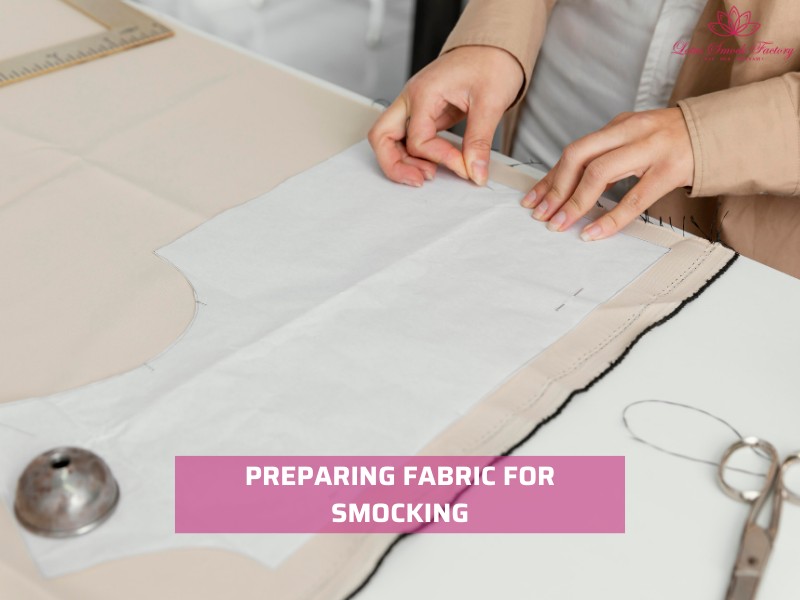
Preparing fabric for smocking is very neeđed
4. How to Smock Fabric by Hand: 5 Easy Steps
If you’re learning how to smock fabric by hand, the process may look tricky at first. But with the right guide, you can do it even as a beginner. Traditional smocking stitches are worked on pleated fabric to add stretch and decoration without elastic. Follow these five clear steps to complete your first smocking project:
4.1. Step 1: Thread your needle and secure knots
First, you should choose a crewel or embroidery needle with embroidery floss or strong sewing thread.
- Cut a piece no longer than your forearm (around 45 cm) so it won’t tangle.
- Tie a small knot at the end.
- Bring the needle up from the back of the pleated fabric so the knot stays hidden and doesn’t spoil the front design.
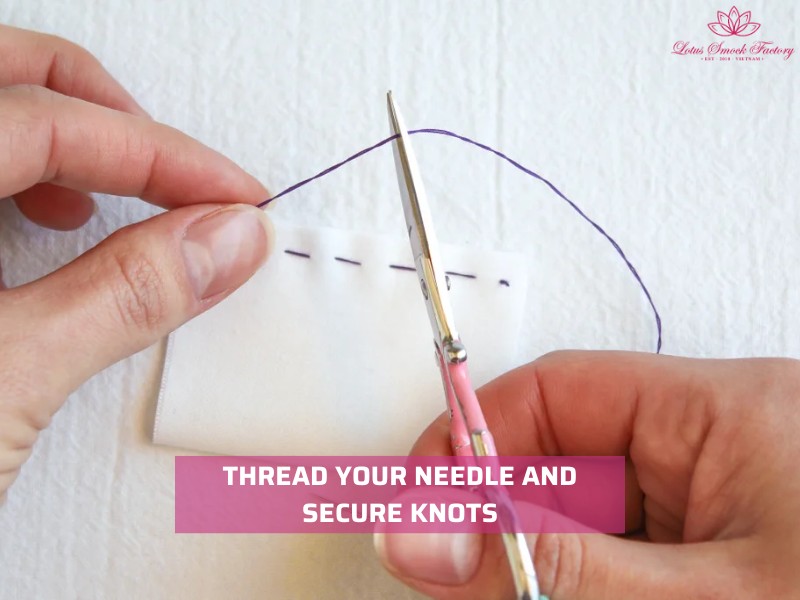
Thread your needle and secure knots
4.2. Step 2: Work the first row of stitches
Then, start with a simple row. This row will set the rhythm for the rest of your work. You can pick one of these basic stitches:
- Cable stitch: Creates a neat rope-like line. Best for straight, firm bands.
- Outline stitch: Looks like a neat border. Good for edges.
- Stem stitch: Great for flowing curves and small designs.
- Honeycomb stitch: Pulls pleats into diamonds. Adds both stretch and texture.
Note: Work slowly, stitch by stitch, across the pleated row. Focus on accuracy rather than speed.
4.3. Step 3: Keep stitch tension even
After that, you pull your thread firmly but not too tightly. If the thread is too loose, stitches will look messy. If it’s too tight, the fabric will pucker or distort.
Keep pleats upright and evenly spaced. A quick way to check is to lay the fabric flat after every few stitches. If the pleats sit evenly, you’re on track.
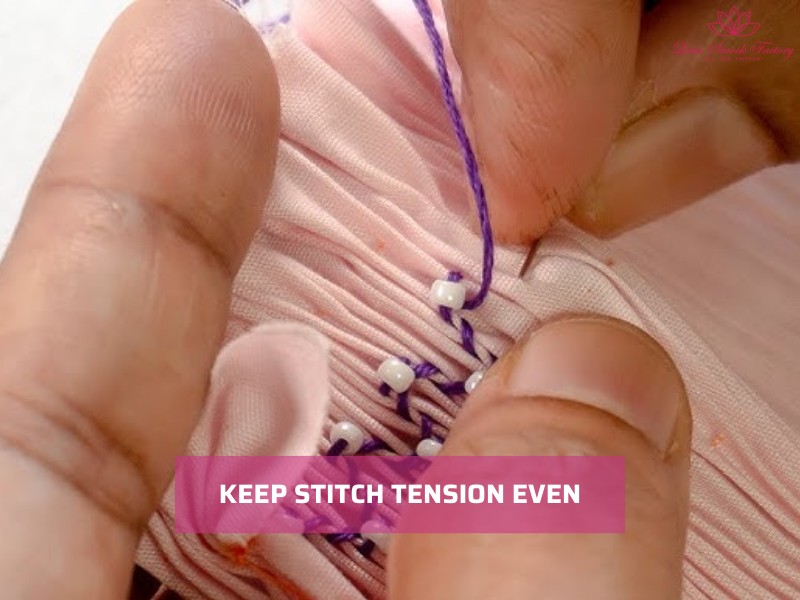
Keep stitch tension even
4.4. Step 4: Add decorative motifs
Once you are confident with straight rows, you can begin:
- Adding small decorative motifs.
- Use simple shapes like hearts, flowers, or initials.
- Mark them lightly with a water-soluble pen on your pleating grid.
This makes it easier to keep spacing even and avoid mistakes. Motifs add personality and make smocking ideal for baby clothes, boutique dresses, or custom cuffs.
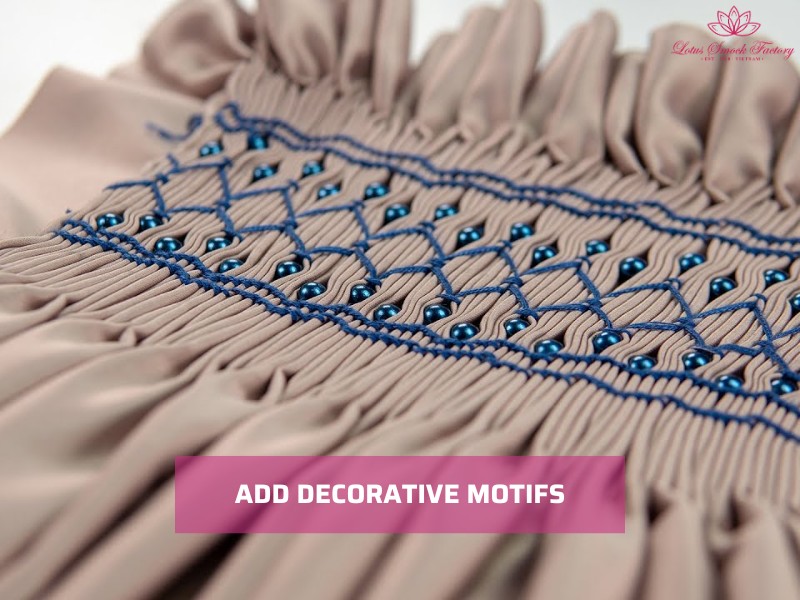
Add decorative motifs
4.5. Step 5: Finish and remove gathering threads
When you reach the end, secure the thread with a knot at the back of the fabric. Then carefully remove the original gathering threads you used to pleat the fabric.
The pleats will now hold their shape thanks to your smocking stitches. Give the panel a light press on the reverse side to set the stitches.
Tip: Begin with a small test piece of 10–12 pleats. Practice cable and honeycomb stitches before attempting decorative motifs.
5. Popular Stitches for Beginners
When you start smocking fabric by hand, it helps to practice a few simple stitches first. These stitches form the base of most designs and give you the confidence to try more advanced work later.
Here are the most common ones you can learn:
- Cable stitch smocking: Creates a rope-like line across pleats. It’s neat, strong, and often used for waistbands or borders. This stitch is ideal for building steady rows.
- Outline stitch: Works as a clean border for patterns. It helps frame other stitches and keeps designs looking sharp. Many sewists use it to separate rows or outline motifs.
- Honeycomb smocking: Forms a diamond-shaped pattern by linking pleats in alternating directions. This stitch adds natural stretch and is popular in cuffs, sleeves, and children’s clothing.
- Wave stitch: Makes soft, scalloped lines that give movement to the fabric. It’s often used in decorative panels or to add texture to collars and dresses.
Tip for beginners: Practice cable and honeycomb stitches first, since they’re easy to master and give quick, satisfying results. Once you feel steady, move on to outline and wave stitches for variety.
6. Fixing Common Smocking Problems
Even with practice, smocking fabric by hand can bring a few challenges. The good news is that most smocking mistakes are easy to fix once you know the cause. Below are the most common issues and how you can solve them:
- Uneven pleats smocking If your pleats look crooked or uneven, mark your fabric carefully before you start. Using a pleater machine or a dot grid helps keep spacing consistent. Always check pleats under good light before stitching.
- Thread snapping: When your thread breaks often, it usually means the tension is too tight or the thread is weak. Switch to a stronger thread, such as embroidery floss, and keep your hand pressure light.
- Fabric puckering: If the fabric looks wrinkled or tight, it means the gathers are not even. Smooth the pleats gently with your fingers and adjust stitches row by row to relax the fabric.
- Misaligned motifs: If patterns like flowers or borders don’t line up, stop and check your guide marks. Correct placement before you continue, since fixing later is harder.
Expert tip: Work slowly in the first rows, because small mistakes here multiply across the design. Taking a few extra minutes early saves hours of correction later.
7. Ready-to-Sell Smocked Outfits from Lotus Smock
If you’re a new boutique owner, you may not have the time to make smocked garments yourself. That’s where Lotus Smock comes in. We create boutique-quality smocked outfits designed for resale in the US and UK, so you can stock seasonal favorites without the extra production work.
Our collections cover every key occasion:
- Christmas Smocked Outfit
- Easter Smocked Outfit
- Halloween Smocked Outfit
- Fourth of July Smocked Outfit
- Smocked Valentine Outfit
- St. Patrick’s Day Outfits
Why Lotus Smock? Premium fabrics, consistent stitching, and designs tailored to boutique markets. You get ready-to-sell outfits that save time and bring reliable seasonal appeal.

Smocked outfits at Lotus Smock
Contact Lotus Smock at:
- Facebook: facebook.com/lotussmockfactory
- WhatsApp: +84 83 333 3498
- Youtube: youtube.com/@LotusSmockFactory
=>>> Read More: How to Smock Fabric on a Sewing Machine: Step-by-Step Guide for Beginners
8. FAQs
- How do you smock fabric without a pleater machine?
You can mark a grid on your fabric, gather it by hand with running stitches, and then add smocking stitches. It takes more time but gives the same effect.
- What fabric works best for smocking?
Light to medium-weight cotton, voile, or batiste are easiest for beginners. They pleat evenly and hold stitches well.
- Can beginners learn smocking fabric by hand?
Yes. Start with simple stitches like cable or honeycomb. Practice on small panels before trying larger projects.
- Can smocking be used on adult clothing?
Yes. Smocking is popular for summer dresses, blouses, and even waistbands. It gives flexibility and a boutique look.
- How do I care for clothes with smocking?
Wash gently, avoid stretching the smocked area, and press lightly on the reverse side to keep the stitches intact.
Final Words
Now you know the answer to the question: how do you smock fabric. Smocking makes fabric soft, flexible, and elegant, which is why people love it for clothes and boutique outfits. You only need basic tools and a little practice to create neat stitches. Try smocking today and enjoy the beauty it brings to your sewing.
Lotus Smock is a brand of TAQ SERVICE TRADING DEVELOPMENT JSC. In clothing business, we’ve been crafting unique pieces for the domestic market since 2010. We prioritize the quality, so we don’t accept overly big orders. We are committed to producing high-quality products at the best prices. Recently, we have started engaging in social media and marketing to reach international customers, bringing the best products from Vietnam to friends around the world.