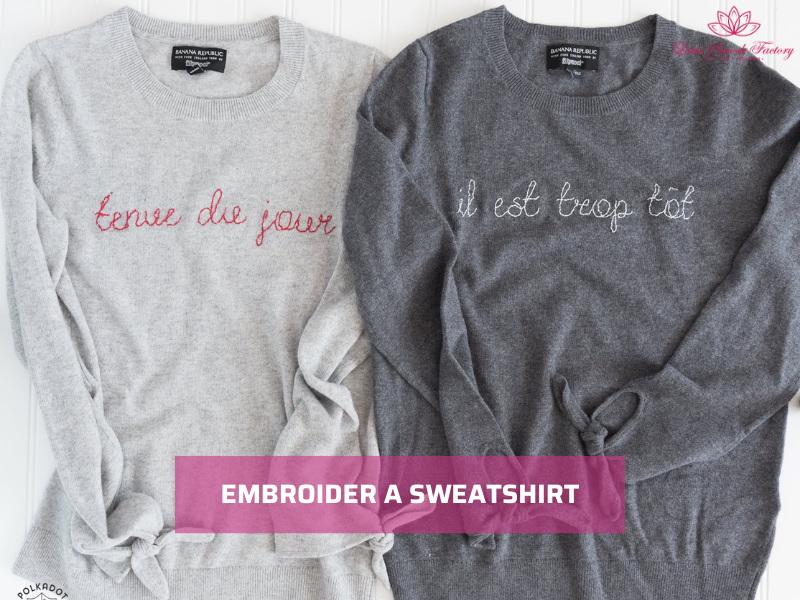
How to Embroider a Sweatshirt: Step-by-Step Guide for Beginners
Do you want your plain sweatshirt to be more personal? Embroidery on a sweatshirt is a way to turn basic clothing into something that reflects your style. It means stitching simple designs, initials, or motifs directly onto the fabric using thread and a needle. Many beginners think thick fabric is hard to work with, but with the right tools and steps, the process is simple.
Learning how to embroider a sweatshirt gives you an affordable way to customize your wardrobe, add creative details, or even start a small business. In this guide, you will learn the materials to use, the stitches that work best, common mistakes to avoid, and care tips for long-lasting results.
1. Why Embroider a Sweatshirt?
When you learn how to embroider a sweatshirt, you can easily personalize your plain clothing. Instead of buying new items, you can personalise what you already own. Sweatshirt embroidery is very practical, creative, and beginner-friendly.
- Affordable customisation
Embroidery is a low-cost way to customise everyday clothing. With only a thread, a needle, and stabiliser, you can add detail that makes a sweatshirt look personal. - Flexible designs
You can stitch initials, small logos, or floral motifs. Each design changes the look of your sweatshirt without altering its comfort. - Durable results
When you use the right stabiliser and thread, embroidery stays strong even after many washes. Sweatshirts are thick enough to hold stitches well, which makes them a good base for long-lasting designs. - Beginner-friendly project
A sweatshirt is large, but you don’t need to start big. Simple stitches like backstitch or satin stitch help you practice on a stable surface and build your skills.
Expert Tip (Experience): You should start with a small design, around 4–5 cm, on the sleeve cuff or chest pocket. These areas are flatter and easier to stitch. Once you feel confident, move on to larger back pieces or complex designs.
2. Understanding Sweatshirt Embroidery
Sweatshirts are a popular choice for embroidery, but they come with specific challenges. The fabric is thicker and often stretchy, which means you need the right tools and methods to get clean results. If you know what makes sweatshirts different, you can plan your design better and avoid problems like puckering or distortion.
2.1. What Makes Sweatshirts Tricky to Embroider?
Most sweatshirts are made from knit fabric. Knit material stretches, and when you stitch on it, the surface can pucker if not supported properly. The fabric is also thick, which puts extra pressure on your tools. Standard embroidery needles may bend or break when pushed through dense sweatshirt material.
This is why stabilisers and stronger needles are essential when working on sweatshirts.
2.2. Best Sweatshirt Fabrics for Embroidery
Not all sweatshirts react the same way to embroidery. Some are easy to stitch, that chosen by many embroiderers:
- Cotton fleece: Stable and soft, this fabric holds stitches well and is recommended for beginners.
- Blended cotton/polyester: Works for embroidery but may stretch more than pure cotton, so stabiliser is even more important.
- Avoid thin or highly elastic sports sweatshirts: These fabrics stretch too much and often distort embroidery.
Expert Tip: Our textile professionals recommend using a medium-weight cut-away stabiliser under sweatshirts. Unlike tear-away stabilisers, cut-away provides permanent support for stretch fabrics and prevents distortion after repeated washing.
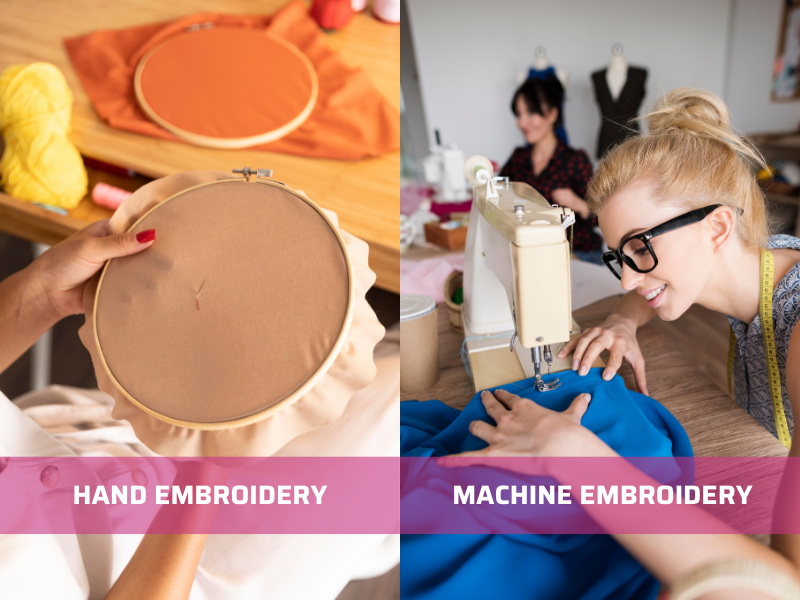
2.3. Hand vs. Machine Embroidery on Sweatshirts
Both hand and machine embroidery can work on sweatshirts, but each has its advantages.
- Hand embroidery: Slower, but allows you to add personal and flexible designs. Perfect for initials, small flowers, or custom motifs.
- Machine embroidery: Faster and consistent, ideal for large logos or bulk projects. However, it requires special equipment and setup.
When you know these differences, you can choose the right approach for your sweatshirt embroidery project.
3. Tools & Materials You’ll Need
Before you start learning how to embroider a sweatshirt, prepare the right tools. Using the correct needles, threads, and stabilisers makes the process smoother and your design more durable.
| Category | Details | Notes / Tips |
| Needles & Hoops | Embroidery needles (size 5–7) | Strong enough for thick sweatshirt fabric without bending. |
| 6–8 inch sturdy hoop | Keeps fabric tension even, reduces puckering while stitching. | |
| Threads & Floss | Cotton embroidery floss | Gives vibrant colours and smooth stitches for visible designs. |
| Metallic threads (shorter lengths) | Add accents and shine, but using shorter pieces prevents fraying. | |
| Stabilisers | Cut-away stabiliser | Best support for knit sweatshirts, prevents distortion over time. |
| Fusible stabiliser | Adds extra control for beginners, especially with stretchy blends. | |
| Other Essentials | Fabric marker or chalk pencil | Helps mark design placement clearly without staining. |
| Small sharp scissors | Trim threads cleanly and avoid fraying. | |
| Thimble | Protects your finger when pushing needles through thick seams. | |
| Expert Tip (Trust) | Place stabiliser under the fabric and inside the sweatshirt | Stops stitches from scratching skin and keeps the design stable after washing. |
With these tools ready, you’ll find stitching on sweatshirts smoother and more manageable, even if it’s your first time.
4. Step-by-Step: How to Embroider a Sweatshirt
Embroidering a sweatshirt may feel intimidating because the fabric is thick and stretchy, but once you break it into small steps, the process is manageable. Follow this guide to stitch your design neatly and make it last through wear and washing.
4.1. Step 1: Prepare the Sweatshirt
Start by preparing your sweatshirt before stitching.
- Wash and dry it once. This prevents future shrinkage from pulling on the embroidery.
- Iron the fabric flat to remove wrinkles. A smooth surface makes it easier to mark and stitch.
- Lay the sweatshirt on a flat table so you can position the design without distortion.
This preparation step ensures that your embroidery looks clean and doesn’t shift after the first wash.
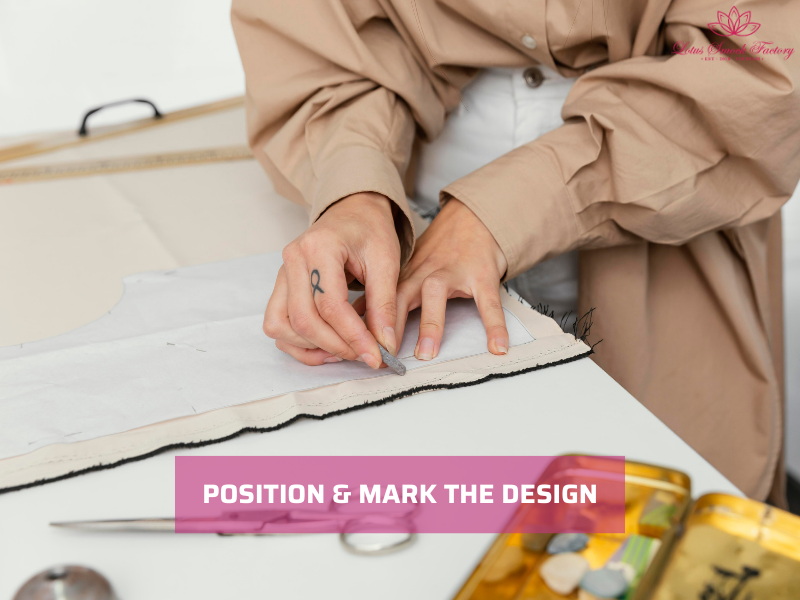
4.2. Step 2: Position & Mark the Design
Next, decide where you want your design. Sweatshirts give you several placement options.
- Popular spots include the chest area, the sleeve cuff, or the shoulder.
- For balance, you avoid placing designs too close to seams, where fabric layers are thicker.
- Draw your design using a water-soluble pen or chalk pencil. Both will wash out easily after stitching.
Expert Tip: You should use masking tape to frame the area around your design. This helps you keep lines straight and ensures that your embroidery follows the sweatshirt’s grain.
Position & mark the design
4.3. Step 3: Hoop & Secure with Stabiliser
Hooping is essential when embroidering on stretchy knits like sweatshirts. Without a stabiliser, the fabric may pucker or distort.
- Place a piece of stabiliser behind the design area. For best results, use a cut-away stabiliser, as it supports the fabric permanently.
- Position the fabric and stabiliser together inside a 6–8 inch hoop.
- Tighten the hoop so the fabric feels firm, but don’t overstretch it. Too much tension can leave marks or distort the design.
This setup gives you a stable surface and makes stitching smoother.
4.4. Step 4: Start Stitching
Now it’s time to embroider your design. Choose simple stitches that show up clearly on thick fabric.
- Backstitch: Ideal for outlines and lettering. Clean and easy to control.
- Satin stitch: Perfect for filling small shapes or letters. Use short, even stitches for a smooth look.
- French knots: Add dotted accents, flower centers, or small decorative details.
Work slowly and check your tension as you stitch. Long floating threads across the back of the sweatshirt may snag, so keep stitches short and secure.
4.5. Step 5: Finish the Back Neatly
Once the design is complete, secure the back so it looks tidy and feels comfortable to wear.
- Knot the thread firmly, then weave the end under a few stitches.
- Trim the stabiliser around the design, but don’t cut directly under the stitches. Leaving some support helps the embroidery hold up after washing.
- If the sweatshirt feels rough inside, you can add a layer of fusible interfacing to cover the stitches. This makes it softer against the skin.
With these steps, even a beginner can learn how to embroider a sweatshirt successfully. Start small with a design on the cuff or chest pocket, then move on to larger motifs once you feel confident.
We recommend using the right stabiliser, hooping carefully, and finishing the back neatly will help your embroidery stay strong and stylish.
5. Common Mistakes & How to Avoid Them
Even with the right tools, beginners often face problems when embroidering sweatshirts. Most of these mistakes come from fabric tension, thread length, or placement. Here are common issues and how to solve them.
Puckering fabric
Sweatshirt fabric stretches, which can cause puckering around your stitches.
=> You fix it by using a cut-away stabiliser and adjusting hoop tension until the fabric feels firm but not overstretched.
Thread tangling
Long strands of floss twist easily and form knots while stitching.
=> To fix it, you cut floss into shorter lengths, around 30–40 cm, to keep it smooth and manageable.
Design off-centre
A design that sits unevenly can ruin the balance of the garment.
=> You should measure carefully before marking and use masking tape to square the area with the sweatshirt’s grain.
Loose stitches after washing
Stitches may loosen or snag in the wash if they are too long or not secured.
=> Knot the thread securely on the back and avoid long floating threads that can catch on fabric.
Expert Tip: Do a small test stitch on an old sweatshirt sleeve before starting your final project. This lets you practice working with thick, stretchy fabric and helps you adjust tension for better results.
6. How to Care Plain Sweatshirt After Embroidering?
Once you finish stitching, the next step is learning how to care for your sweatshirt so the embroidery stays neat. Proper washing and handling prevent stitches from loosening or colours from fading. Follow these tips to keep your work in good condition.
Wash inside out in cold water
You should always turn the sweatshirt inside out before washing. Use cold water on a gentle cycle or hand wash. This reduces friction on the embroidery and keeps thread colours bright.
Avoid bleach and harsh detergents
Strong chemicals weaken threads and fabric. You should stick to mild detergent and skip fabric softener, which can coat the stitches and make them dull.
Lay flat to dry
Do not use high tumble heat in a dryer. Heat can shrink fabric and loosen embroidery. Instead, lay the sweatshirt flat on a towel and let it air dry. If you need to use a dryer, choose a low heat setting.
Press with a cloth
When ironing, place a pressing cloth between the iron and the embroidery. Press lightly from the reverse side to avoid flattening the stitches.
Expert Tip: Fashion embellishment experts recommend adding a simple machine zigzag or hand whip stitch around large embroidered designs. This extra step prevents the edges from lifting and can increase the lifespan of your embroidery by about 50%.
With the right care, your embroidered sweatshirt will hold its shape, keep its colour, and last through many wears and washes.
7. FAQs
7.1. Can you embroider a sweatshirt without a hoop?
Yes, but it is harder to keep the fabric stable. Sweatshirts are thick and stretchy, so stitches may pucker without support. A hoop helps keep tension even. If you prefer not to use one, work on small designs and hold the fabric taut with your hand.
7.2. What stitch works best on thick fabric?
Backstitch and satin stitch are the most reliable on sweatshirts. Backstitch gives clean outlines, while satin stitch fills shapes smoothly. French knots also work well for small accents. Long, loose stitches should be avoided because they can snag during wear.
7.3. Do you need stabiliser for every design?
Yes. Sweatshirts are knit fabrics, and stabiliser keeps them from stretching during embroidery. Cut-away stabiliser is the best choice because it supports the design permanently, even after multiple washes. Small motifs may work with fusible stabiliser, but using support under the fabric is always safer.
7.4. Can I machine embroider sweatshirts at home?
Yes, if you have the right equipment. A standard home embroidery machine can handle sweatshirts with the correct hoop and stabiliser. Machine embroidery is faster and produces consistent stitches, which is useful for logos or large designs. Hand embroidery is still a good choice for small motifs or one-off projects.
8. Final Words
Now you know the basics of how to embroider a sweatshirt by hand. Start with a small design on the cuff or chest to practice, then move on to bigger motifs once you feel confident. Use a stabiliser, choose the right stitches, and finish the back neatly so your embroidery lasts through washes and daily wear.
Pick up a sweatshirt today and try your first design. When you are ready to explore more, check out related tutorials on floral embroidery and other stitches to expand your skills.
Lotus Smock is a brand of TAQ SERVICE TRADING DEVELOPMENT JSC. In clothing business, we’ve been crafting unique pieces for the domestic market since 2010. We prioritize the quality, so we don’t accept overly big orders. We are committed to producing high-quality products at the best prices. Recently, we have started engaging in social media and marketing to reach international customers, bringing the best products from Vietnam to friends around the world.
Contact Lotus Smock at:
- Facebook: facebook.com/lotussmockfactory
- WhatsApp: +84 83 333 3498
- Youtube: youtube.com/@LotusSmockFactory